Overview
Softaculous Virtualizor supports the remote creation of Virtual Machines / VPS. Blesta can be configured to create the VPS as soon as you accept the Order (Automatically or Manually). We provide a module for Blesta to enable you to do so. Setting it up is really easy. You can create, delete, suspend and many more operation on VPS with this module.
In the new version of the module we have included the End User panel of Virtualizor so that the End Users can manage their VPS from Blesta only and they do not need to login to Virtualizor Panel. Everything can be done right from Blesta itself.
Note: This module version 2 requires Virtualizor 2.8.0+ on the master.
The existing plans created on "Blesta Module Version 1" will be backward compatible
Download
Download the Virtualizor Blesta module (2.1.3) from HERE. (Updated on: 04 March, 2024)
Unzip it and upload the folder virtualizor (the folder itself), in your /path/to/blesta/components/modules/ Directory.
Please make sure that the upload was done properly and the following folder exists : /path/to/blesta/components/modules/.
Features
VPS Action View in Blesta Admin Panel 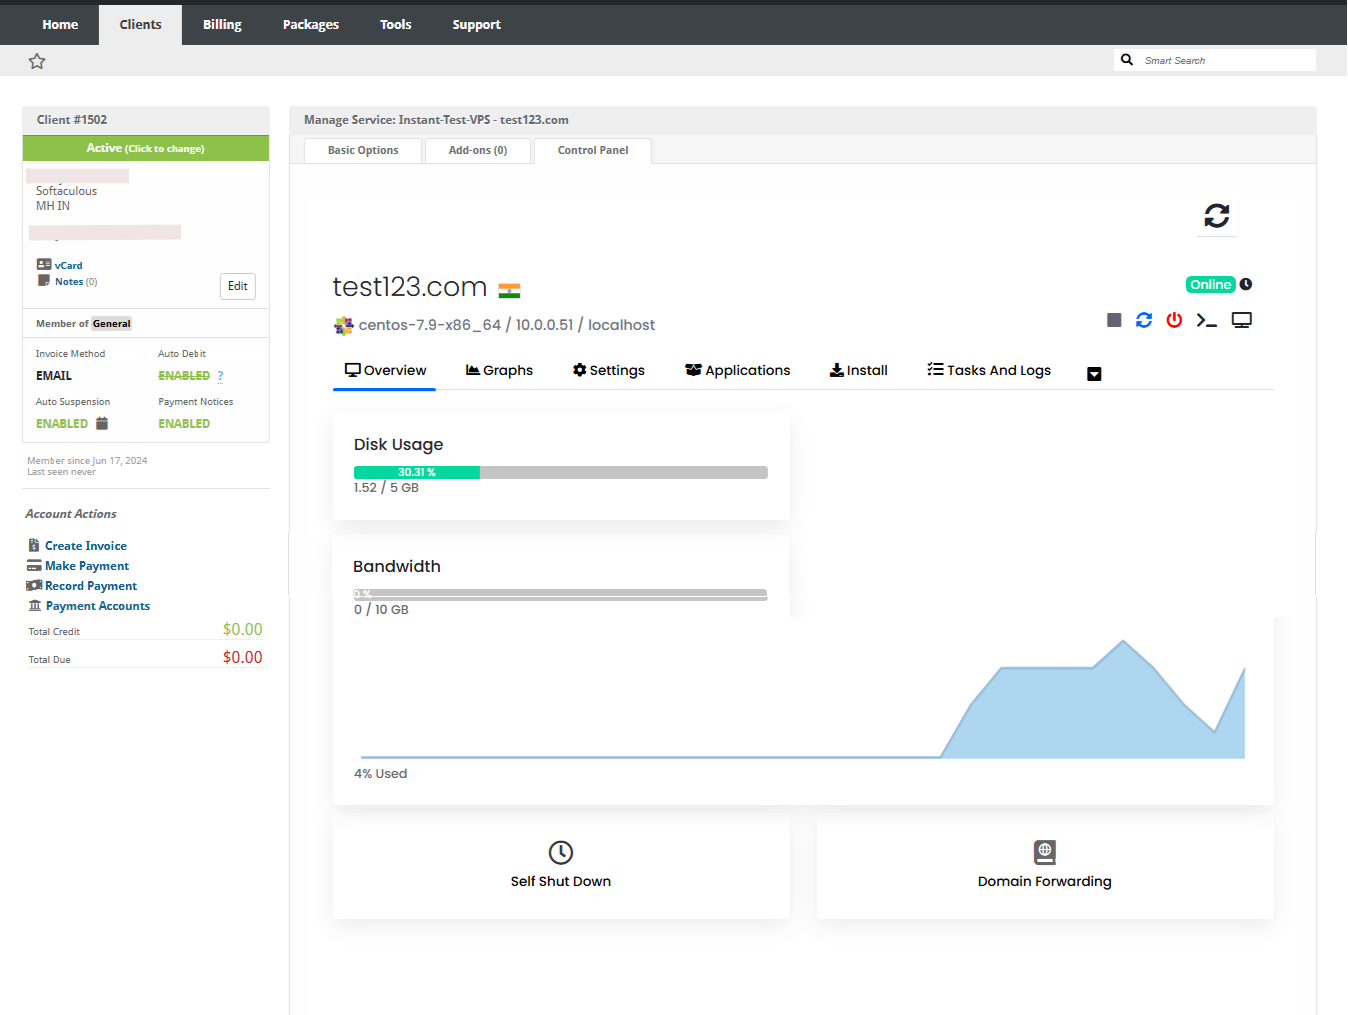
VPS Panel View in Blesta Client Panel 
Servers Key
Virtualizor generates a Unique Key and Key Pass when its installed on the server. You will need the servers Key and Key Pass to add the server to Blesta.
This information can be found from the Virtualizor Admin Panel -> Configuration -> Server Info 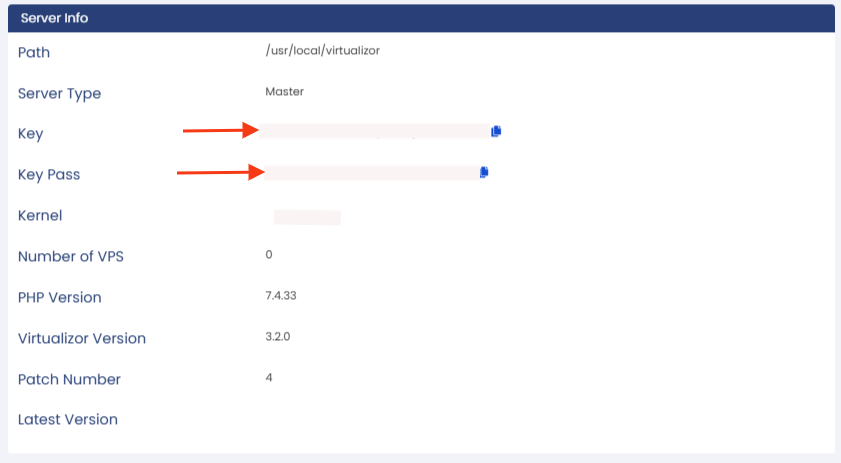
Activating Blesta Module
To activate Blesta Module, Navigate to Settings located in upper right corner. Under the Company tab, click on Modules. Go to Modules > Available, you will see Virtualizor Module and click on Install.
Adding Virtualizor Server to Blesta
To add the Virtualizor Server, navigate to Settings Page, under Modules > Installed Page, click on Manage Button
Fill the form as shown in the below images :

You can also add that server into a Server Group
Create a Virtualizor Package under Blesta Admin Panel
Make sure you have added the Server to create a Blesta Package. To add the Package, navigate to Packages and click on Create Package Button on that page.

Module Options
The fields are self explanatory, but the following is a detailed explanation :
- Type : The Virtualization type of the server you added.
- Select Plan : Select the Plan that you have created on your Virtualizor Panel.
- Server Groups : Select Server Group or Node Group on which the vps needs to be created.
- OS : The OS field is the List of Operating System Templates on your server. Virtualizor provides templates to its users. Its a COMMA separated value. This will allow the USER to choose the OS when he is signing up for the VPS. Also the list should not have the template suffix of tar.gz, img, etc. e.g. centos-7-x86_64.tar.gz should be centos-7-x86_64 in the OS List. Basically the module does a name match of the OS Template.
Configurable Option [OPTIONAL]
You can add the Configurable Options as per your requirements or
exclude one or more of the options below if you do not need it.
- iso
- num_ips
- num_ips_int
- num_ips6
- num_ips6_subnet
- ippoolid
- space
- ram
- swapram
- bandwidth
- cores
- network_speed
- control_panel
- server_group
- recipe
- total_iops_sec
- read_bytes_sec
- write_bytes_sec
- cpu_percent
- admin_managed
- rdp
Additional Params : (Since 3.0.0+)
If these parameters are added as configurable option then VM(s) will be created with Plan Value + Configurable option value.
For e.g. If VPS plan has space defined as 5GB and additional_space configurable option is added as 20GB, and while ordering if this 20GB option is selected, then VM will be created with 25GB.
You can use the following parameters as additional param :
- additional_ram
- additional_space
- additional_bandwidth
- additional_cores
- additional_num_ips
- additional_num_ips_int
- additional_num_ips6
- additional_num_ips6_subnet
Other Advance Configurable Options
- hostname
- swapram
- virtio
- nic_type
- vif_type
- osreinstall_limit
- kvm_cache
- io_mode
- iso - ISO
- sec_iso - Secondary ISO
- mgs - Media Groups (NOTE : Put ID of the Media Group for this configurable option.
You can get it from Virtualizor Admin panel-> Media -> Media Groups ) - stid - Storage to use
- ippoolid - IP Pool ID, for selecting IPs from particular IP Pool. (NOTE: You can specify multiple IP Pool Ids with comma separated)
- dnsplid - Setting DNS Plans
- Total I/Os per sec
- Read Mega Bytes/s
- Write Mega Bytes/s
- topology_sockets
- topology_cores
- topology_threads
- bpid - This is for assigning backup plans to the VPS. You can get the backup plan ID from Admin Panel -> List Backup Plans.
- upload_speed - This option will help in upgrading/downgrading upload speed.
- recipe - This is for recipe which you want to get executed when VM is provisioned. You can get the recipe ID from Admin panel -> Recipes -> List Recipes. You can set the recipe as 1|Recipe Name
- ha - This option will help to create vps with HA enabled, assuming HA nodes are already configured.
Value of this option should be 1 to enable HA for the vps.
Client Operations
Control Panel 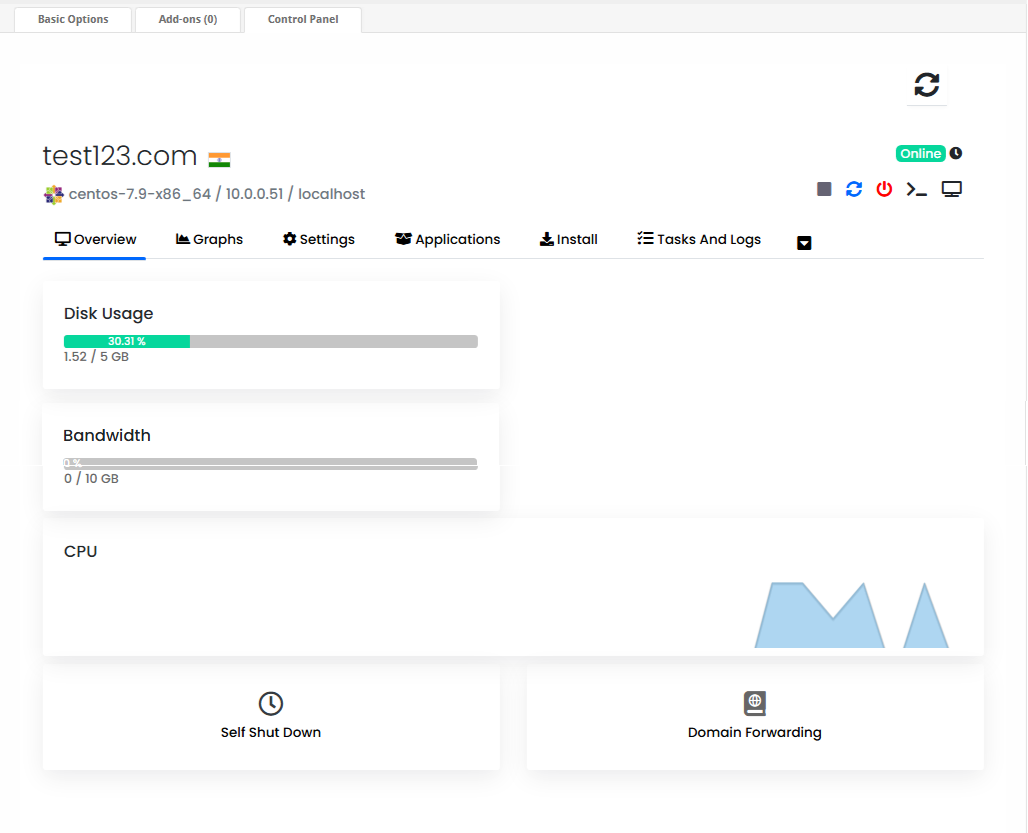
Firewall Port
Please make sure, that the Blesta server, master server and the slave servers have ports 4081,4082,4083,4084 and 4085 opened.
Support
If you need any assistance then please contact Softaculous Virtualizor Support. Please send us a screenshot of the Module Settings and the Custom Fields you added to the Product.